Getting started
Find below a detailed walkthrough that can guide you through the required steps before you can start using the SmartVault API and some suggestions on what you can do while familiarizing with it.
1. Register for a SmartVault developer account
To make use of the endpoints stated in this API, you'll need to register a SmartVault developer account first of all. To do this, send us an email.
The developer should be creating the developer account using an email that is different from the one they use to access the subscription account.Once registered, you'll receive an activation email that's needed to be accepted to follow on.
When you click the link received on the email used during registration, you should be able to log in using the newly created account credentials.
If there are more than one account, select the developer one and you should see something like the following image:

This means your new developer account is set up and good to go!
2. Adding a new client
Go to the Developer Clients tab and press the Create New Client button.

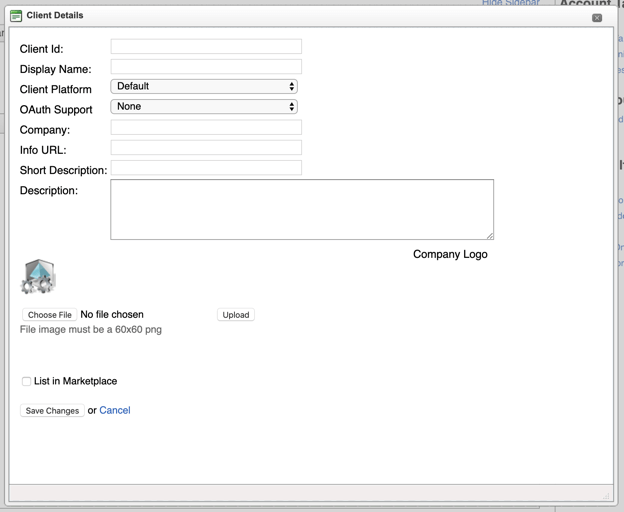
A popup will show prompting you to fill some fields:

If you select Autonomous as the OAuth support option, you'll need to generate a pair of public / private keys. Find more information about this in the section below.
3. Authentication steps
3.1 Requesting a nonce
First of all, we need to request a nonce from SmartVault for this particular new developer client just created.
Find more information about requesting a nonce here.3.2 Requesting a client token
To retrieve the client token, we need to use the private key from the public / private key pair generated while creating the new client on the previous section.
Find more information about retrieving a client token and check some code snippets that can help build a helper to retrieve your client token in your integration here.3.3 Get authorization URL for delegated user
You need to do this step to authorize every new user that will use the API. After performing this request, you will get a url for the user to authorize this client id integration to use the SmartVault API on behalf of them.
Find more information about retrieving this URL here.3.4 Request delegation token for user
This will create a delegation token that will be used with the authorized user email in pretty much every following API data request as the Authorization header.
Find more information about retrieving the delegation token here.
4. What now?
Now that you managed to get your delegation token, you can use it to perform every possible data request in the SmartVault API.
userEmail + ':' + delegationToken;
Also, remember that for requesting a new delegation token or getting user account information you will need to set it up like the following instead:
clientId + ':' + clientToken;
Knowing this, we can suggest some things to do to familiarize with the SmartVault API like exploring its structure, creating new folder, uploading files or creating clients and / or engagements.
4.1 Getting to know the account structure
/nodes/pth?children=1&eprop=1&vprop=1
Knowing that the structure follows this hierarchy:
Account -> Clients -> Containers -> Vaults -> Folders -> Files
and, for the sake of the example, let's suppose the Account name is "SmartVault", we would be able to to a request like:
/nodes/pth/SmartVault?children=1&eprop=1&vprop=1
This would yield us with all the Vaults present in the account.
You can explore the whole nodes structure using the same request structure:
/nodes/pth/SmartVault/Folder1/Folder2/Document.pdf?children=1&eprop=1&vprop=1 // This example request would return a file called "Document.pdf" with FileNodeType
The request response will tell you which type of node you are retrieving in the field "nodeType" (ContainerNodeType, FolderNodeType, FileNodeType).
Check the files and folders documentation for more specific information about this request and its CRUD operations (creating new folders, uploading new files, etc.).
4.2 Add new entities to your account
In the SmartVault infrastructure, employees, clients and engagements are considered as "entities".
We suggest you explore the Entities section to get to know more about what interactions each entity have and learn more about them.
Some examples of what you can do using the specific entity documentation would be creating a new employee for an account or modifying an engagement.
Generating a key for autonomous auth
If you select the autonomous option in the OAuth Support dropdown while creating a new client, you'll be asked to fill a "Public key" textarea for what you'll need a RSA public / private key pair with a length of at least 1024 bits. To generate these keys, you can download and run KeyGenerator.exe, which will provide you with a private-key.xml and a public-key.xml, or you can use OpenSSL to generate these keys by running the following two commands:
openssl genrsa -out rsaprivkey.pem 2048openssl rsa -in rsaprivkey.pem -pubout -outform PEM -out rsapubkey.pem
This will give you a public key in rsapubkey.pem and a private key in rsaprivkey.pem. You need to copy the whole content of the public key, including the "header" and "footer" of it and paste that into the textarea.
-----BEGIN PUBLIC KEY----- <- Don't ignore this// YOUR KEY-----END PUBLIC KEY----- <- Don't ignore this neither
You'll need the private one later on when requesting a client token.
It is your responsibility to keep the private key secure, since this is what gives you access to your users’ data.